Faster ComfyUI Nodes for Flux and Stable Diffusion with Pruna


In today's rapidly evolving landscape of machine learning, accessibility and efficiency are paramount. ComfyUI has revolutionized image generation by providing an intuitive, node-based interface that empowers users—from beginners to experts—to create powerful workflows to serve image generation models like Stable Diffusion or Flux. However, as models grow larger and more complex, generation times can slow down, increasing computational demands and costs.
Pruna tackles these challenges head-on by optimizing models to be faster, smaller, cheaper, and greener. By integrating Pruna's advanced optimization techniques directly into ComfyUI through our custom nodes, you can accelerate both Stable Diffusion and Flux inference, with minimal degradation in output quality. This means smoother, more efficient image generation—even as your models scale up.
In this blog post, you'll learn how to integrate the Pruna nodes into ComfyUI to supercharge your Stable Diffusion and Flux workflows. We'll walk you through each step and show you how these optimizations can lead to faster, more efficient image generation. In addition, we’ll include a benchmark comparing Pruna nodes with other popular efficiency nodes, using a range of image quality and performance metrics. For additional resources and updates, visit our repository—and if you find it helpful, consider giving it a star!
Getting Started
Setting up Pruna within ComfyUI is straightforward. With just a few steps, you'll be ready to optimize your Stable Diffusion or Flux models for faster inference right inside the ComfyUI interface. Here's a quick guide to get started.
Step 1 - Prerequisites
To run our nodes, you will need a Linux system with a GPU. First, set up a conda environment, then install both ComfyUI and Pruna:
Create a conda environment, e.g. with
conda create -n comfyui python=3.11 && conda activate comfyui
To use Pruna Pro, you also need to export your Pruna token as an environment variable:
export PRUNA_TOKEN=<your_token_here>
[Optional] If you want to use the x-fast or stable-fast compiler, you need to install additional dependencies:
pip install pruna[stable-fast]==0.2.3
Note: To use our caching nodes or the x_fast compiler, you need access to Pruna Pro.
Step 2 - Pruna node integration
With your environment prepared, you're ready to integrate Pruna nodes into your ComfyUI setup. Follow these steps to clone the repository and launch ComfyUI:
Navigate to your ComfyUI installation’s custom_nodes folder:
cd <path_to_comfyui>/custom_nodesClone the ComfyUI_pruna repository:
git clone https://github.com/PrunaAI/ComfyUI_pruna.gitLaunch ComfyUI
cd <path_to_comfyui> && python main.py --disable-cuda-malloc --gpu-only
After completing these steps, you should now be able to see all the Pruna nodes in the nodes menu, under the Pruna category.
Pruna nodes - A short explanation
Pruna adds four powerful nodes to ComfyUI:
- a compilation node, that optimizes inference speed through model compilation. While this technique preserves output quality, performance gains can vary depending on the model.
- Three distinct caching nodes, each implementing a unique strategy to accelerate inference by reusing intermediate computations:
- Adaptive Caching: Dynamically adjusts caching for each prompt by identifying the optimal inference steps to reuse cached outputs.
- Periodic Caching: Caches model outputs at fixed intervals, reusing them in subsequent steps to reduce computation.
- Auto Caching: Automatically determines the optimal caching schedule to achieve a target latency reduction with minimal quality trade-off.
By tuning the hyperparameters of each node, you can achieve the best trade-off between speed and output quality for your specific use case. For more details, please check out the detailed guide in our repo or the documentation.
Pruna in Action: Accelerate Stable Diffusion and Flux
In our repo, we offer multiple workflows to help you get started with Pruna — designed either for
Stable Diffusion or Flux. In the examples below, we use our powerful Pruna Cache Auto node.
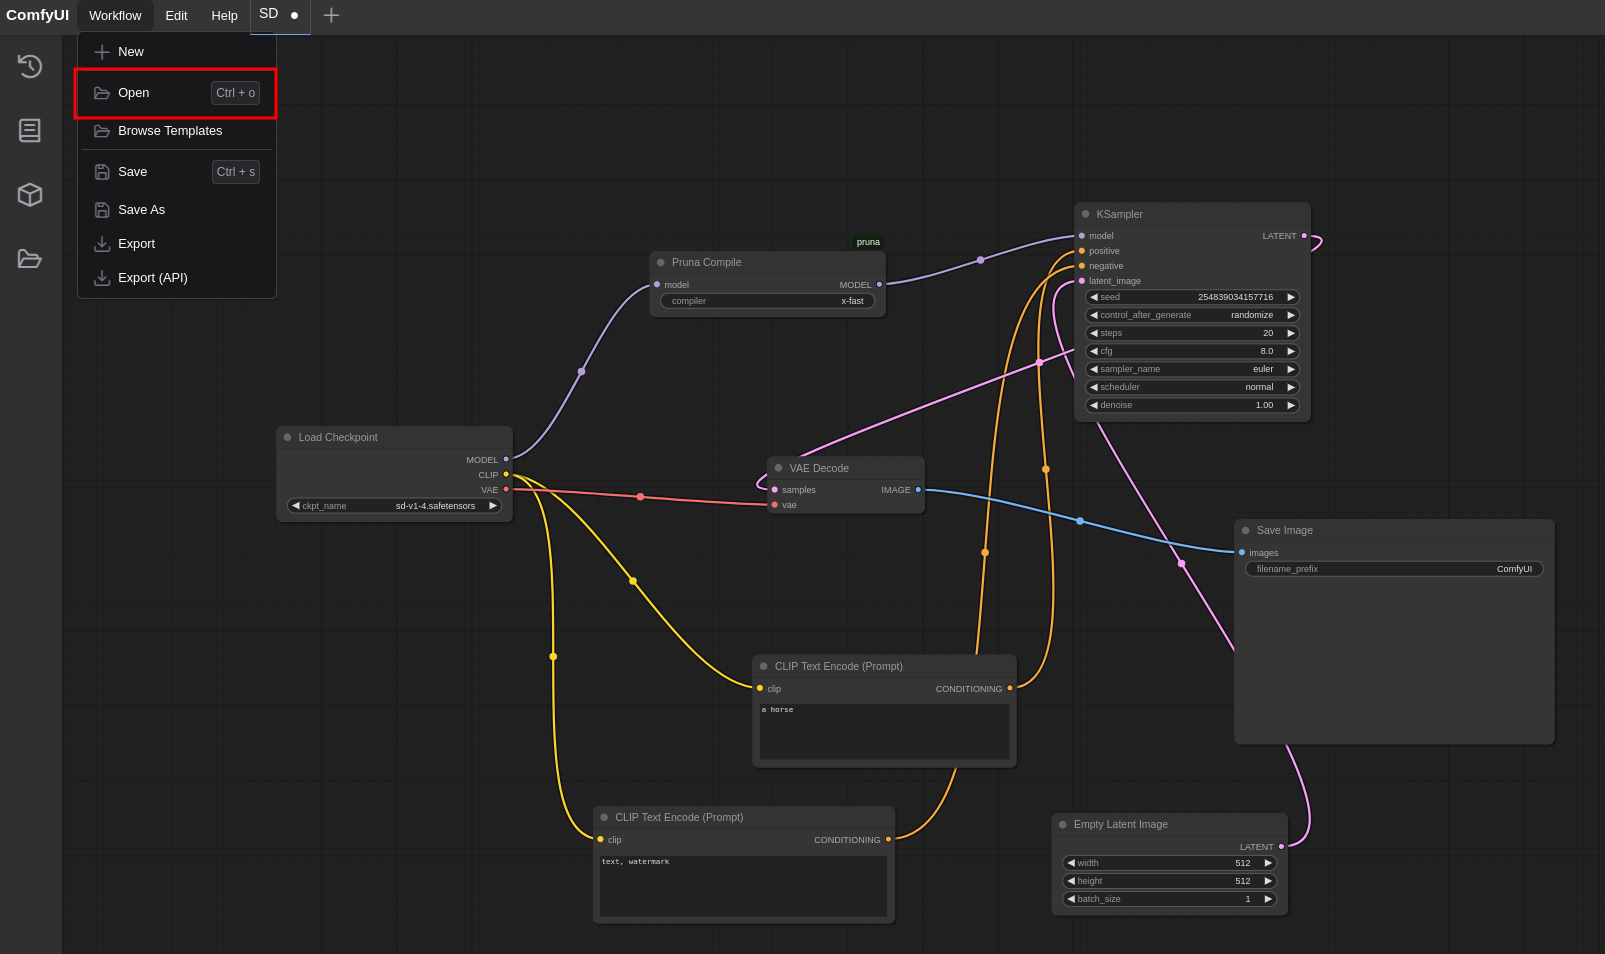
You can load a workflow either by dragging and dropping the provided JSON file into the ComfyUI window or by clicking Open in the Workflow tab, as shown here.
Example 1 - Stable Diffusion

In this example, we accelerate the inference of the Stable Diffusion v1.4 model. To get started, download the model and place it in the appropriate folder:
- Download the model.
- Place it in
<path_to_comfyui>/models/checkpoints.
Then, use the Stable Diffusion workflow as described above to generate images.
Example 2 - Flux

For Flux, the setup is a bit more involved due to its multi-component pipeline. To use the Flux workflow, you'll need to download each component of the model individually. Specifically:
- For CLIP, download the clip_l.safetensors and t5xxl_fp16.safetensors files, and place them in
<path_to_comfyui>/models/clip/. - For VAE, download the VAE model and place it in
<path_to_comfyui>/models/vae/. - For the Flux model, download the weights and place them in
<path_to_comfyui>/models/diffusion_models/. If you are unable to access the link, you can request model access on Hugging Face.
Now, load the Flux workflow, and you are ready to go!
Enjoy the speed-up!🎉
Benchmarks and Evaluation of the Flux model
To assess the performance of our optimization algorithms, we benchmarked Pruna’s Auto Caching in Taylor mode against the Flux dev model and two established caching techniques: TeaCache and First Block Cache. For TeaCache, we used rel_l1_thresh = 0.4 and max_skip_steps = 3, while for First Block Cache, we set residual_diff_threshold = 0.12. We measured latency, speedup, emissions, energy and image-quality metrics on 65 prompts from the PartiPrompts dataset, generating a single 1024×1024 image with 50 denoising steps on an NVIDIA L40S GPU. Emissions and energy were estimated using the CodeCarbon package. All caching algorithms were additionally combined with the torch_compile compiler.
| Metrics | Base model | Taylor + Auto - 0.4 | Taylor + Auto - 0.3 | Taylor + Auto - 0.2 | TeaCache | First Block Cache |
|---|---|---|---|---|---|---|
| Elapsed time (s) ↓ | 23.88 | 8.16 | 6.24 | 4.24 | 7.82 | 6.06 |
| Speedup ↑ | x1.00 | x2.93 | x3.83 | x5.63 | x3.05 | x3.94 |
| Emissions (kgCO₂eq) ↓ | 9.9 × 10⁻⁴ | 3.4 × 10⁻⁴ | 2.6 × 10⁻⁴ | 1.8 × 10⁻⁴ | 3.2 × 10⁻⁴ | 2.5 × 10⁻⁴ |
| Energy (kWh) ↓ | 2.7× 10⁻³ | 9.2 × 10⁻⁴ | 7.0 × 10⁻⁴ | 4.7 × 10⁻⁴ | 8.8 × 10⁻⁴ | 6.9 × 10⁻⁴ |
| CLIP score ↑ | 17.55 | 17.43 | 17.38 | 17.62 | 17.36 | 17.40 |
| FID ↓ | N/A | 70.84 | 74.93 | 91.11 | 87.76 | 92.66 |
| PSNR ↑ | N/A | 17.50 | 17.26 | 15.71 | 16.19 | 16.15 |
| SSIM ↑ | N/A | 0.77 | 0.76 | 0.72 | 0.72 | 0.72 |
| LPIPS ↓ | N/A | 0.209 | 0.220 | 0.265 | 0.267 | 0.274 |
| Sharpness ↑ | 7365 | 6967 | 7179 | 6699 | 6986 | 6749 |
Examining the table, Auto Caching at speed_factor = 0.4 delivers the same speedup as TeaCache, and at 0.3 rivals First Block Cache. However, in both cases Pruna maintains superior quality metrics. You can push for even greater gains (up to a 5.6× boost at 0.2), though the resulting drop in fidelity may matter for more demanding use cases. To provide a more intuitive comparison of how each caching strategy balances latency, energy efficiency, and image‐quality metrics, the following radar plot summarizes these trade-offs across all methods.

To get a visual inspection too, we also show here the images generated from the different methods, using a variety of prompts. We observed that at a speed_factor of 0.4 — and even 0.3 in most cases — Auto Caching produces visuals nearly indistinguishable from those of the Base model.

Prompts (from top to bottom): 1. “a cat jumping in the air to catch a bird” 2. “Three-quarters front view of a yellow 2017 Corvette coming around a curve in a mountain road and looking over a green valley on a cloudy day.” 3. "a capybara” 4. "a city intersection” 5. "a bookshelf with ten books stacked vertically"
Closing Remarks
We’re excited to see how Pruna’s advanced optimization techniques empower ComfyUI to elevate your image generation workflows. Our benchmarks demonstrate significant performance gains, enabling you to push the boundaries of your creative projects 🚀
For any questions, feedback or community discussions, feel free to join our Discord where you can also get help from our dedicated help-desk channel.
For bug reports or technical issues, please open an issue in our repository.
