

File size: 6,843 Bytes
d40f40d |
1 2 3 4 5 6 7 8 9 10 11 12 13 14 15 16 17 18 19 20 21 22 23 24 25 26 27 28 29 30 31 32 33 34 35 36 37 38 39 40 41 42 43 44 45 46 47 48 49 50 51 52 53 54 55 56 57 58 59 60 61 62 63 64 65 66 67 68 69 70 71 72 73 74 75 76 77 78 79 80 81 82 83 84 85 86 87 88 89 90 91 92 93 94 95 96 97 98 99 100 101 102 103 104 105 106 107 108 109 110 111 112 113 114 115 116 117 118 119 120 121 122 123 124 125 126 127 128 129 130 131 132 133 134 135 136 137 138 139 140 141 142 143 144 145 146 147 148 149 150 151 152 153 154 155 156 157 158 159 160 161 162 163 164 165 166 167 168 169 170 171 172 173 174 175 176 177 178 179 180 |
# 使用 OpenTelemetry 检查运行记录
[[open-in-colab]]
> [!TIP]
> 如果您是初次构建Agent,建议先阅读 [Agent 入门指南](../conceptual_guides/intro_agents) 和 [smolagents 导览](../guided_tour)。
## 为什么需要记录Agent运行?
调试Agent运行过程具有挑战性。
验证运行是否正常进行很困难,因为Agent的工作流程本身具有 [设计上的不可预测性](../conceptual_guides/intro_agents)(如果可预测,直接使用传统代码即可)。
检查运行记录同样困难:多步骤的Agent往往会快速在控制台生成大量日志,而大多数错误只是"LLM 低级错误"类型的问题,通常LLM会在后续步骤中通过生成更好的代码或工具调用来自我修正。
因此,在生产环境中使用监控工具记录Agent运行过程,对于后续检查和分析至关重要!
我们采用 [OpenTelemetry](https://opentelemetry.io/) 标准来实现Agent运行监控。
这意味着您只需添加少量监控代码,即可在正常运行Agent时自动记录所有信息到监控平台。以下是在不同OpenTelemetry后端实现此功能的示例:
在监控平台上的展示效果如下:
<div class="flex justify-center">
<img src="https://huggingface.co/datasets/huggingface/documentation-images/resolve/main/smolagents/inspect_run_phoenix.gif"/>
</div>
## 使用 Arize AI Phoenix 配置遥测
首先安装必要的软件包。这里我们选择安装 [Arize AI 的 Phoenix](https://github.com/Arize-ai/phoenix) 作为日志收集和检查方案,您也可以使用其他兼容 OpenTelemetry 的平台来完成收集与检查工作。
```shell
pip install 'smolagents[telemetry]'
```
接着在后台运行日志收集器:
```shell
python -m phoenix.server.main serve
```
最后配置 `SmolagentsInstrumentor` 来追踪Agent活动,并将追踪数据发送至 Phoenix 默认端点:
```python
from phoenix.otel import register
from openinference.instrumentation.smolagents import SmolagentsInstrumentor
register()
SmolagentsInstrumentor().instrument()
```
完成上述配置后,即可正常运行您的Agent!
```py
from smolagents import (
CodeAgent,
ToolCallingAgent,
WebSearchTool,
VisitWebpageTool,
InferenceClientModel,
)
model = InferenceClientModel()
search_agent = ToolCallingAgent(
tools=[WebSearchTool(), VisitWebpageTool()],
model=model,
name="search_agent",
description="This is an agent that can do web search.",
)
manager_agent = CodeAgent(
tools=[],
model=model,
managed_agents=[search_agent],
)
manager_agent.run(
"If the US keeps its 2024 growth rate, how many years will it take for the GDP to double?"
)
```
Voilà!
此时访问 `http://0.0.0.0:6006/projects/` 即可查看运行记录:
<img src="https://huggingface.co/datasets/huggingface/documentation-images/resolve/main/smolagents/inspect_run_phoenix.png">
如图所示,CodeAgent 调用了其托管的 ToolCallingAgent(注:托管Agent也可以是另一个 CodeAgent)执行美国2024年经济增长率的网络搜索。托管Agent返回报告后,管理Agent根据结果计算出经济翻倍周期!是不是很智能?
## 使用 Langfuse 配置遥测
本部分演示如何通过 `SmolagentsInstrumentor` 使用 **Langfuse** 监控和调试 Hugging Face **smolagents**。
> **Langfuse 是什么?** [Langfuse](https://langfuse.com) 是面向LLM工程的开源平台,提供AI Agent的追踪与监控功能,帮助开发者调试、分析和优化产品。该平台通过原生集成、OpenTelemetry 和 SDKs 与各类工具框架对接。
### 步骤 1: 安装依赖
```python
%pip install smolagents
%pip install opentelemetry-sdk opentelemetry-exporter-otlp openinference-instrumentation-smolagents
```
### 步骤 2: 配置环境变量
设置 Langfuse API 密钥,并配置 OpenTelemetry 端点将追踪数据发送至 Langfuse。通过注册 [Langfuse Cloud](https://cloud.langfuse.com) 或 [自托管 Langfuse](https://langfuse.com/self-hosting) 获取 API 密钥。
同时需添加 [Hugging Face 令牌](https://huggingface.co/settings/tokens) (`HF_TOKEN`) 作为环境变量:
```python
import os
import base64
LANGFUSE_PUBLIC_KEY="pk-lf-..."
LANGFUSE_SECRET_KEY="sk-lf-..."
LANGFUSE_AUTH=base64.b64encode(f"{LANGFUSE_PUBLIC_KEY}:{LANGFUSE_SECRET_KEY}".encode()).decode()
os.environ["OTEL_EXPORTER_OTLP_ENDPOINT"] = "https://cloud.langfuse.com/api/public/otel" # EU data region
# os.environ["OTEL_EXPORTER_OTLP_ENDPOINT"] = "https://us.cloud.langfuse.com/api/public/otel" # US data region
os.environ["OTEL_EXPORTER_OTLP_HEADERS"] = f"Authorization=Basic {LANGFUSE_AUTH}"
# your Hugging Face token
os.environ["HF_TOKEN"] = "hf_..."
```
### 步骤 3: 初始化 `SmolagentsInstrumentor`
在应用程序代码执行前初始化 `SmolagentsInstrumentor`。配置 `tracer_provider` 并添加 span processor 将追踪数据导出至 Langfuse。`OTLPSpanExporter()` 会自动使用环境变量中配置的端点和请求头。
```python
from opentelemetry.sdk.trace import TracerProvider
from openinference.instrumentation.smolagents import SmolagentsInstrumentor
from opentelemetry.exporter.otlp.proto.http.trace_exporter import OTLPSpanExporter
from opentelemetry.sdk.trace.export import SimpleSpanProcessor
trace_provider = TracerProvider()
trace_provider.add_span_processor(SimpleSpanProcessor(OTLPSpanExporter()))
SmolagentsInstrumentor().instrument(tracer_provider=trace_provider)
```
### 步骤 4: 运行 smolagent
```python
from smolagents import (
CodeAgent,
ToolCallingAgent,
WebSearchTool,
VisitWebpageTool,
InferenceClientModel,
)
model = InferenceClientModel(
model_id="deepseek-ai/DeepSeek-R1-Distill-Qwen-32B"
)
search_agent = ToolCallingAgent(
tools=[WebSearchTool(), VisitWebpageTool()],
model=model,
name="search_agent",
description="This is an agent that can do web search.",
)
manager_agent = CodeAgent(
tools=[],
model=model,
managed_agents=[search_agent],
)
manager_agent.run(
"How can Langfuse be used to monitor and improve the reasoning and decision-making of smolagents when they execute multi-step tasks, like dynamically adjusting a recipe based on user feedback or available ingredients?"
)
```
### 步骤 5: 在 Langfuse 中查看追踪记录
运行Agent后,您可以在 [Langfuse](https://cloud.langfuse.com) 平台查看 smolagents 应用生成的追踪记录。这些记录会详细展示LLM的交互步骤,帮助您调试和优化AI代理。
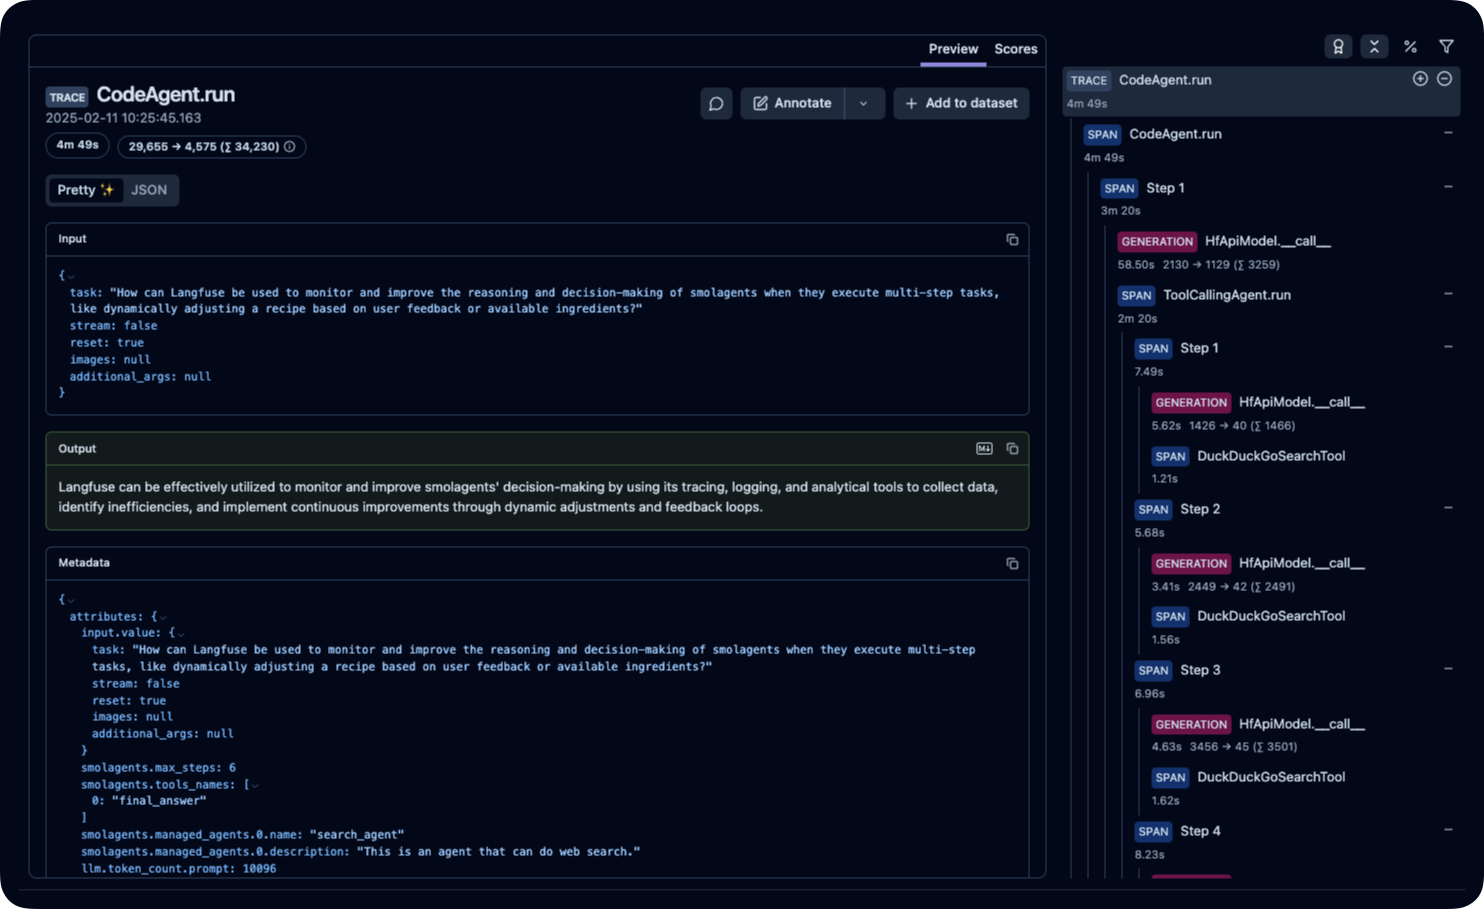
_[Langfuse 公开示例追踪](https://cloud.langfuse.com/project/cloramnkj0002jz088vzn1ja4/traces/ce5160f9bfd5a6cd63b07d2bfcec6f54?timestamp=2025-02-11T09%3A25%3A45.163Z&display=details)_ |