Spaces:
Paused

Paused
File size: 30,973 Bytes
2f5127c |
1 2 3 4 5 6 7 8 9 10 11 12 13 14 15 16 17 18 19 20 21 22 23 24 25 26 27 28 29 30 31 32 33 34 35 36 37 38 39 40 41 42 43 44 45 46 47 48 49 50 51 52 53 54 55 56 57 58 59 60 61 62 63 64 65 66 67 68 69 70 71 72 73 74 75 76 77 78 79 80 81 82 83 84 85 86 87 88 89 90 91 92 93 94 95 96 97 98 99 100 101 102 103 104 105 106 107 108 109 110 111 112 113 114 115 116 117 118 119 120 121 122 123 124 125 126 127 128 129 130 131 132 133 134 135 136 137 138 139 140 141 142 143 144 145 146 147 148 149 150 151 152 153 154 155 156 157 158 159 160 161 162 163 164 165 166 167 168 169 170 171 172 173 174 175 176 177 178 179 180 181 182 183 184 185 186 187 188 189 190 191 192 193 194 195 196 197 198 199 200 201 202 203 204 205 206 207 208 209 210 211 212 213 214 215 216 217 218 219 220 221 222 223 224 225 226 227 228 229 230 231 232 233 234 235 236 237 238 239 240 241 242 243 244 245 246 247 248 249 250 251 252 253 254 255 256 257 258 259 260 261 262 263 264 265 266 267 268 269 270 271 272 273 274 275 276 277 278 279 280 281 282 283 284 285 286 287 288 289 290 291 292 293 294 295 296 297 298 299 300 301 302 303 304 305 306 307 308 309 310 311 312 313 314 315 316 317 318 319 320 321 322 323 324 325 326 327 328 329 330 331 332 333 334 335 336 337 338 339 340 341 342 343 344 345 346 347 348 349 350 351 352 353 354 355 356 357 358 359 360 361 362 363 364 365 366 367 368 369 370 371 372 373 374 375 376 377 378 379 380 381 382 383 384 385 386 387 388 389 390 391 392 393 394 395 396 397 398 399 400 401 402 403 404 405 406 407 408 409 410 411 412 413 414 415 416 417 418 419 420 421 422 423 424 425 426 427 428 429 430 431 432 433 434 435 436 437 438 439 440 441 442 443 444 445 446 447 448 449 450 451 452 453 454 455 456 457 458 459 460 461 462 463 464 465 466 467 468 469 470 471 472 473 474 475 476 477 478 479 480 481 482 483 484 485 486 487 488 489 490 491 492 493 494 495 496 497 498 499 500 501 502 503 504 505 506 507 508 509 510 511 512 513 514 515 516 517 518 519 520 521 522 523 524 525 526 527 528 529 530 531 532 533 534 535 536 537 538 539 540 541 542 543 544 545 546 547 548 549 550 551 552 553 554 555 556 557 558 559 560 561 562 563 564 565 566 567 568 569 570 571 572 573 574 575 576 577 578 579 580 581 582 583 584 585 586 587 588 589 590 591 592 593 594 595 596 597 598 599 600 601 602 603 604 605 606 607 608 609 610 611 612 613 614 615 616 617 618 619 620 621 622 623 624 625 626 627 628 629 630 631 632 633 634 635 636 637 638 639 640 641 642 643 644 645 646 647 648 649 650 651 652 653 654 655 656 657 658 659 660 661 662 663 664 665 666 667 668 669 670 671 |
# Supervised Fine-tuning Trainer
[](https://huggingface.co/models?other=sft,trl) [](https://github.com/huggingface/smol-course/tree/main/1_instruction_tuning)
Supervised fine-tuning (SFT) is the most common step in post-training foundation models, and also one of the most effective. In TRL, we provide a simple API to train models with SFT in a few lines of code; for a complete training script, check out [`trl/scripts/sft.py`](https://github.com/huggingface/trl/tree/main/trl/scripts/sft.py). Experimental support for Vision Language Models is also included in [`examples/scripts/sft_vlm.py`](https://github.com/huggingface/trl/tree/main/examples/scripts/sft_vlm.py).
## Quickstart
If you have a dataset hosted on the 🤗 Hub, you can easily fine-tune your SFT model using [`SFTTrainer`] from TRL. Let us assume your dataset is `imdb`, the text you want to predict is inside the `text` field of the dataset, and you want to fine-tune the `facebook/opt-350m` model.
The following code-snippet takes care of all the data pre-processing and training for you:
```python
from datasets import load_dataset
from trl import SFTConfig, SFTTrainer
dataset = load_dataset("stanfordnlp/imdb", split="train")
training_args = SFTConfig(
max_length=512,
output_dir="/tmp",
)
trainer = SFTTrainer(
"facebook/opt-350m",
train_dataset=dataset,
args=training_args,
)
trainer.train()
```
Make sure to pass the correct value for `max_length` as the default value will be set to `min(tokenizer.model_max_length, 1024)`.
You can also construct a model outside of the trainer and pass it as follows:
```python
from transformers import AutoModelForCausalLM
from datasets import load_dataset
from trl import SFTConfig, SFTTrainer
dataset = load_dataset("stanfordnlp/imdb", split="train")
model = AutoModelForCausalLM.from_pretrained("facebook/opt-350m")
training_args = SFTConfig(output_dir="/tmp")
trainer = SFTTrainer(
model,
train_dataset=dataset,
args=training_args,
)
trainer.train()
```
The above snippets will use the default training arguments from the [`SFTConfig`] class. If you want to modify the defaults, pass in your modification to the `SFTConfig` constructor and pass it to the trainer via the `args` argument.
## Advanced usage
### Train on completions only
To train on completions only, simply use a [prompt-completion](dataset_formats#prompt-completion) dataset. In this mode, loss is computed solely on the completion part.
If you’d like to compute loss on both the prompt **and** the completion while still using a prompt-completion dataset, set `completion_only_loss=False` in the [`SFTConfig`]. This is equivalent to [converting the dataset to a language modeling](dataset_formats#from-prompt-completion-to-language-modeling-dataset) format.
### Add Special Tokens for Chat Format
Adding special tokens to a language model is crucial for training chat models. These tokens are added between the different roles in a conversation, such as the user, assistant, and system, and help the model recognize the structure and flow of a conversation. This setup is essential for enabling the model to generate coherent and contextually appropriate responses in a chat environment.
The [`setup_chat_format`] function in `trl` easily sets up a model and tokenizer for conversational AI tasks. This function:
- Adds special tokens to the tokenizer, e.g., `<|im_start|>` and `<|im_end|>`, to indicate the start and end of a conversation.
- Resizes the model’s embedding layer to accommodate the new tokens.
- Sets the `chat_template` of the tokenizer, which is used to format the input data into a chat-like format. The default is `chatml` from OpenAI.
- _optionally_ you can pass `resize_to_multiple_of` to resize the embedding layer to a multiple of the `resize_to_multiple_of` argument, e.g., `64`. If you want to see more formats being supported in the future, please open a GitHub issue on [trl](https://github.com/huggingface/trl)
```python
from transformers import AutoModelForCausalLM, AutoTokenizer
from trl import setup_chat_format
# Load model and tokenizer
model = AutoModelForCausalLM.from_pretrained("facebook/opt-350m")
tokenizer = AutoTokenizer.from_pretrained("facebook/opt-350m")
# Set up the chat format with the default 'chatml' format
model, tokenizer = setup_chat_format(model, tokenizer)
```
> [!WARNING]
> Some base models, like those from Qwen, have a predefined chat template in the model's tokenizer. In these cases, it is not necessary to apply `setup_chat_format()`, as the tokenizer already handles the formatting. However, it is necessary to align the EOS token with the chat template to ensure the model's responses terminate correctly. In these cases, specify `eos_token` in `SFTConfig`; for example, for `Qwen/Qwen2.5-1.5B`, one should set `eos_token="<|im_end|>"`.
With our model and tokenizer set up, we can now fine-tune our model on a conversational dataset. Below is an example of how a dataset can be formatted for fine-tuning.
### Dataset format support
The [`SFTTrainer`] supports popular dataset formats. This allows you to pass the dataset to the trainer without any pre-processing directly. The following formats are supported:
* conversational format
```json
{"messages": [{"role": "system", "content": "You are helpful"}, {"role": "user", "content": "What's the capital of France?"}, {"role": "assistant", "content": "..."}]}
{"messages": [{"role": "system", "content": "You are helpful"}, {"role": "user", "content": "Who wrote 'Romeo and Juliet'?"}, {"role": "assistant", "content": "..."}]}
{"messages": [{"role": "system", "content": "You are helpful"}, {"role": "user", "content": "How far is the Moon from Earth?"}, {"role": "assistant", "content": "..."}]}
```
* instruction format
```json
{"prompt": "<prompt text>", "completion": "<ideal generated text>"}
{"prompt": "<prompt text>", "completion": "<ideal generated text>"}
{"prompt": "<prompt text>", "completion": "<ideal generated text>"}
```
If your dataset uses one of the above formats, you can directly pass it to the trainer without pre-processing. The [`SFTTrainer`] will then format the dataset for you using the defined format from the model's tokenizer with the [apply_chat_template](https://huggingface.co/docs/transformers/main/en/chat_templating#templates-for-chat-models) method.
```python
from datasets import load_dataset
from trl import SFTConfig, SFTTrainer
...
# load jsonl dataset
dataset = load_dataset("json", data_files="path/to/dataset.jsonl", split="train")
# load dataset from the HuggingFace Hub
dataset = load_dataset("philschmid/dolly-15k-oai-style", split="train")
...
training_args = SFTConfig(packing=True)
trainer = SFTTrainer(
"facebook/opt-350m",
args=training_args,
train_dataset=dataset,
)
```
If the dataset is not in one of those formats, you can either preprocess the dataset to match the formatting or pass a formatting function to the SFTTrainer to do it for you. Let's have a look.
### Format your input prompts
For instruction fine-tuning, it is quite common to have two columns inside the dataset: one for the prompt & the other for the response.
This allows people to format examples like [Stanford-Alpaca](https://github.com/tatsu-lab/stanford_alpaca) did as follows:
```bash
Below is an instruction ...
### Instruction
{prompt}
### Response:
{completion}
```
Let us assume your dataset has two fields, `question` and `answer`. Therefore you can just run:
```python
...
def formatting_prompts_func(example):
return f"### Question: {example['question']}\n ### Answer: {example['answer']}"
trainer = SFTTrainer(
model,
args=training_args,
train_dataset=dataset,
formatting_func=formatting_prompt_func,
)
trainer.train()
```
To properly format your input, make sure to process all the examples by looping over them and returning a list of processed text. Check out a full example of how to use SFTTrainer on the alpaca dataset [here](https://github.com/huggingface/trl/pull/444#issue-1760952763)
### Packing dataset
[`SFTTrainer`] supports _example packing_, where multiple short examples are packed in the same input sequence to increase training efficiency. To enable the usage of this dataset class, simply pass `packing=True` to the [`SFTConfig`] constructor.
```python
...
training_args = SFTConfig(packing=True)
trainer = SFTTrainer(
"facebook/opt-350m",
train_dataset=dataset,
args=training_args
)
trainer.train()
```
Note that if you use a packed dataset and if you pass `max_steps` in the training arguments, you will probably train your models for more than a few epochs, depending on the way you have configured the packed dataset and the training protocol. Double-check that you know and understand what you are doing.
If you don't want to pack your `eval_dataset`, you can pass `eval_packing=False` to the `SFTConfig` init method.
#### Customize your prompts using packed dataset
If your dataset has several fields that you want to combine, for example, if the dataset has `question` and `answer` fields and you want to combine them, you can pass a formatting function to the trainer that will take care of that. For example:
```python
def formatting_func(example):
text = f"### Question: {example['question']}\n ### Answer: {example['answer']}"
return text
training_args = SFTConfig(packing=True)
trainer = SFTTrainer(
"facebook/opt-350m",
train_dataset=dataset,
args=training_args,
formatting_func=formatting_func
)
trainer.train()
```
### Control over the pretrained model
You can directly pass the kwargs of the `from_pretrained()` method to the [`SFTConfig`]. For example, if you want to load a model in a different precision, analogous to
```python
model = AutoModelForCausalLM.from_pretrained("facebook/opt-350m", torch_dtype=torch.bfloat16)
...
training_args = SFTConfig(
model_init_kwargs={
"torch_dtype": "bfloat16",
},
output_dir="/tmp",
)
trainer = SFTTrainer(
"facebook/opt-350m",
train_dataset=dataset,
args=training_args,
)
trainer.train()
```
Note that all keyword arguments of `from_pretrained()` are supported.
### Training adapters
We also support tight integration with 🤗 PEFT library so that any user can conveniently train adapters and share them on the Hub instead of training the entire model.
```python
from datasets import load_dataset
from trl import SFTConfig, SFTTrainer
from peft import LoraConfig
dataset = load_dataset("trl-lib/Capybara", split="train")
peft_config = LoraConfig(
r=16,
lora_alpha=32,
lora_dropout=0.05,
target_modules="all-linear",
modules_to_save=["lm_head", "embed_token"],
task_type="CAUSAL_LM",
)
trainer = SFTTrainer(
"Qwen/Qwen2.5-0.5B",
train_dataset=dataset,
args=SFTConfig(output_dir="Qwen2.5-0.5B-SFT"),
peft_config=peft_config
)
trainer.train()
```
> [!WARNING]
> If the chat template contains special tokens like `<|im_start|>` (ChatML) or `<|eot_id|>` (Llama), the embedding layer and LM head must be included in the trainable parameters via the `modules_to_save` argument. Without this, the fine-tuned model will produce unbounded or nonsensical generations. If the chat template doesn't contain special tokens (e.g., Alpaca), then the `modules_to_save` argument can be ignored or set to `None`.
You can also continue training your `PeftModel`. For that, first load a `PeftModel` outside `SFTTrainer` and pass it directly to the trainer without the `peft_config` argument being passed.
### Training adapters with base 8 bit models
For that, you need to first load your 8 bit model outside the Trainer and pass a `PeftConfig` to the trainer. For example:
```python
...
peft_config = LoraConfig(
r=16,
lora_alpha=32,
lora_dropout=0.05,
bias="none",
task_type="CAUSAL_LM",
)
model = AutoModelForCausalLM.from_pretrained(
"EleutherAI/gpt-neo-125m",
load_in_8bit=True,
device_map="auto",
)
trainer = SFTTrainer(
model,
train_dataset=dataset,
args=SFTConfig(),
peft_config=peft_config,
)
trainer.train()
```
## Using Flash Attention and Flash Attention 2
You can benefit from Flash Attention 1 & 2 using SFTTrainer out of the box with minimal changes of code.
First, to make sure you have all the latest features from transformers, install transformers from source
```bash
pip install -U git+https://github.com/huggingface/transformers.git
```
Note that Flash Attention only works on GPU now and under half-precision regime (when using adapters, base model loaded in half-precision)
Note also both features are perfectly compatible with other tools such as quantization.
### Using Flash-Attention 1
For Flash Attention 1 you can use the `BetterTransformer` API and force-dispatch the API to use Flash Attention kernel. First, install the latest optimum package:
```bash
pip install -U optimum
```
Once you have loaded your model, wrap the `trainer.train()` call under the `with torch.backends.cuda.sdp_kernel(enable_flash=True, enable_math=False, enable_mem_efficient=False):` context manager:
```diff
...
+ with torch.backends.cuda.sdp_kernel(enable_flash=True, enable_math=False, enable_mem_efficient=False):
trainer.train()
```
Note that you cannot train your model using Flash Attention 1 on an arbitrary dataset as `torch.scaled_dot_product_attention` does not support training with padding tokens if you use Flash Attention kernels. Therefore, you can only use that feature with `packing=True`. If your dataset contains padding tokens, consider switching to Flash Attention 2 integration.
Below are some numbers you can get in terms of speedup and memory efficiency, using Flash Attention 1, on a single NVIDIA-T4 16GB.
| use_flash_attn_1 | model_name | max_seq_len | batch_size | time per training step |
| ---------------- | ----------------- | ----------- | ---------- | ---------------------- |
| ✓ | facebook/opt-350m | 2048 | 8 | ~59.1s |
| | facebook/opt-350m | 2048 | 8 | **OOM** |
| ✓ | facebook/opt-350m | 2048 | 4 | ~30.3s |
| | facebook/opt-350m | 2048 | 4 | ~148.9s |
### Using Flash Attention-2
To use Flash Attention 2, first install the latest `flash-attn` package:
```bash
pip install -U flash-attn
```
And add `attn_implementation="flash_attention_2"` when calling `from_pretrained`:
```python
model = AutoModelForCausalLM.from_pretrained(
model_id,
load_in_4bit=True,
attn_implementation="flash_attention_2"
)
```
If you don't use quantization, make sure your model is loaded in half-precision and dispatch your model on a supported GPU device.
After loading your model, you can either train it as it is or attach adapters and train adapters on it in case your model is quantized.
In contrast to Flash Attention 1, the integration makes it possible to train your model on an arbitrary dataset that also includes padding tokens.
### Using the model creation utility
We included a utility function to create your model.
[[autodoc]] ModelConfig
```python
from trl import ModelConfig, SFTTrainer, get_kbit_device_map, get_peft_config, get_quantization_config
model_args = ModelConfig(
model_name_or_path="facebook/opt-350m"
attn_implementation=None, # or "flash_attention_2"
)
torch_dtype = (
model_args.torch_dtype
if model_args.torch_dtype in ["auto", None]
else getattr(torch, model_args.torch_dtype)
)
quantization_config = get_quantization_config(model_args)
model_kwargs = dict(
revision=model_args.model_revision,
trust_remote_code=model_args.trust_remote_code,
attn_implementation=model_args.attn_implementation,
torch_dtype=torch_dtype,
use_cache=False if training_args.gradient_checkpointing else True,
device_map=get_kbit_device_map() if quantization_config is not None else None,
quantization_config=quantization_config,
)
model = AutoModelForCausalLM.from_pretrained(model_args.model_name_or_path, **model_kwargs)
trainer = SFTTrainer(
...,
model=model_args.model_name_or_path,
peft_config=get_peft_config(model_args),
)
```
### Enhance the model's performance using NEFTune
NEFTune is a technique to boost the performance of chat models and was introduced by the paper ["NEFTune: Noisy Embeddings Improve Instruction Finetuning"](https://huggingface.co/papers/2310.05914) from Jain et al. It consists of adding noise to the embedding vectors during training. According to the abstract of the paper:
> Standard finetuning of LLaMA-2-7B using Alpaca achieves 29.79% on AlpacaEval, which rises to 64.69% using noisy embeddings. NEFTune also improves over strong baselines on modern instruction datasets. Models trained with Evol-Instruct see a 10% improvement, with ShareGPT an 8% improvement, and with OpenPlatypus an 8% improvement. Even powerful models further refined with RLHF, such as LLaMA-2-Chat, benefit from additional training with NEFTune.
<div style="text-align: center">
<img src="https://huggingface.co/datasets/trl-lib/documentation-images/resolve/main/neft-screenshot.png">
</div>
To use it in `SFTTrainer`, simply pass `neftune_noise_alpha` when creating your `SFTConfig` instance. Note that to avoid any surprising behaviour, NEFTune is disabled after training to revert to the original behaviour of the embedding layer.
```python
from datasets import load_dataset
from trl import SFTConfig, SFTTrainer
dataset = load_dataset("stanfordnlp/imdb", split="train")
training_args = SFTConfig(
neftune_noise_alpha=5,
)
trainer = SFTTrainer(
"facebook/opt-350m",
train_dataset=dataset,
args=training_args,
)
trainer.train()
```
We have tested NEFTune by training `mistralai/Mistral-7B-v0.1` on the [OpenAssistant dataset](https://huggingface.co/datasets/timdettmers/openassistant-guanaco) and validated that using NEFTune led to a performance boost of ~25% on MT Bench.
<div style="text-align: center">
<img src="https://huggingface.co/datasets/trl-lib/documentation-images/resolve/main/trl-neftune-mistral-7b.png">
</div>
Note however, that the amount of performance gain is _dataset dependent_ and in particular, applying NEFTune on synthetic datasets like [UltraChat](https://huggingface.co/datasets/stingning/ultrachat) typically produces smaller gains.
### Accelerate fine-tuning 2x using `unsloth`
You can further accelerate QLoRA / LoRA (2x faster, 60% less memory) using the [`unsloth`](https://github.com/unslothai/unsloth) library that is fully compatible with `SFTTrainer`. Currently, `unsloth` supports only Llama (Yi, TinyLlama, Qwen, Deepseek, etc) and Mistral architectures. Some benchmarks on 1x A100 listed below:
| 1 A100 40GB | Dataset | 🤗 | 🤗 + Flash Attention 2 | 🦥 Unsloth | 🦥 VRAM saved |
| --------------- | --------- | --- | --------------------- | --------- | ------------ |
| Code Llama 34b | Slim Orca | 1x | 1.01x | **1.94x** | -22.7% |
| Llama-2 7b | Slim Orca | 1x | 0.96x | **1.87x** | -39.3% |
| Mistral 7b | Slim Orca | 1x | 1.17x | **1.88x** | -65.9% |
| Tiny Llama 1.1b | Alpaca | 1x | 1.55x | **2.74x** | -57.8% |
First, install `unsloth` according to the [official documentation](https://github.com/unslothai/unsloth). Once installed, you can incorporate unsloth into your workflow in a very simple manner; instead of loading `AutoModelForCausalLM`, you just need to load a `FastLanguageModel` as follows:
```python
import torch
from trl import SFTConfig, SFTTrainer
from unsloth import FastLanguageModel
max_length = 2048 # Supports automatic RoPE Scaling, so choose any number
# Load model
model, tokenizer = FastLanguageModel.from_pretrained(
model_name="unsloth/mistral-7b",
max_seq_length=max_length,
dtype=None, # None for auto detection. Float16 for Tesla T4, V100, Bfloat16 for Ampere+
load_in_4bit=True, # Use 4bit quantization to reduce memory usage. Can be False
# token = "hf_...", # use one if using gated models like meta-llama/Llama-2-7b-hf
)
# Do model patching and add fast LoRA weights
model = FastLanguageModel.get_peft_model(
model,
r=16,
target_modules=[
"q_proj",
"k_proj",
"v_proj",
"o_proj",
"gate_proj",
"up_proj",
"down_proj",
],
lora_alpha=16,
lora_dropout=0, # Dropout = 0 is currently optimized
bias="none", # Bias = "none" is currently optimized
use_gradient_checkpointing=True,
random_state=3407,
)
training_args = SFTConfig(output_dir="./output", max_length=max_length)
trainer = SFTTrainer(
model=model,
args=training_args,
train_dataset=dataset,
)
trainer.train()
```
The saved model is fully compatible with Hugging Face's transformers library. Learn more about unsloth in their [official repository](https://github.com/unslothai/unsloth).
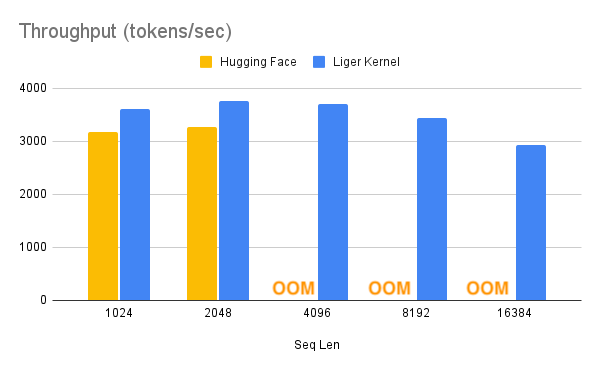
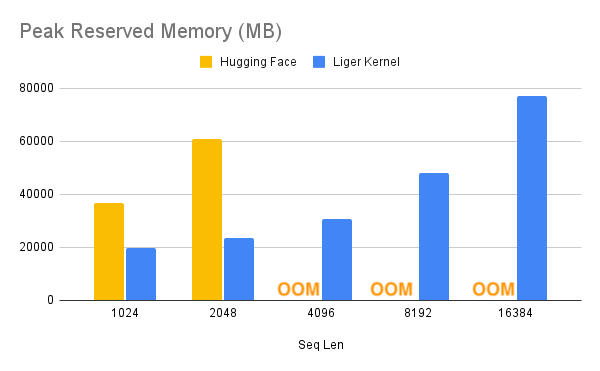
## Liger-Kernel: Increase 20% throughput and reduce 60% memory for multi-GPU training
[Liger Kernel](https://github.com/linkedin/Liger-Kernel) is a collection of Triton kernels designed specifically for LLM training. It can effectively increase multi-GPU training throughput by 20% and reduce memory usage by 60%. That way, we can **4x** our context length, as described in the benchmark below. They have implemented Hugging Face Compatible `RMSNorm`, `RoPE`, `SwiGLU`, `CrossEntropy`, `FusedLinearCrossEntropy`, and more to come. The kernel works out of the box with [Flash Attention](https://github.com/Dao-AILab/flash-attention), [PyTorch FSDP](https://pytorch.org/tutorials/intermediate/FSDP_tutorial.html), and [Microsoft DeepSpeed](https://github.com/microsoft/DeepSpeed).
With this memory reduction, you can potentially turn off `cpu_offloading` or gradient checkpointing to further boost the performance.
| Speed Up | Memory Reduction |
|--------------------------|-------------------------|
|  |  |
1. To use Liger-Kernel in [`SFTTrainer`], first install it by:
```bash
pip install liger-kernel
```
2. Once installed, set `use_liger_kernel` in [`SFTConfig`]. No other changes are needed!
```python
training_args = SFTConfig(
use_liger_kernel=True,
...
)
```
To learn more about Liger-Kernel, visit their [official repository](https://github.com/linkedin/Liger-Kernel/).
## Best practices
Pay attention to the following best practices when training a model with that trainer:
- [`SFTTrainer`] always truncates by default the sequences to the `max_length` argument of the [`SFTConfig`]. If none is passed, the trainer will retrieve that value from the tokenizer. Some tokenizers do not provide a default value, so there is a check to retrieve the minimum between 1024 and that value. Make sure to check it before training.
- For training adapters in 8bit, you might need to tweak the arguments of the `prepare_model_for_kbit_training` method from PEFT, hence we advise users to use `prepare_in_int8_kwargs` field, or create the `PeftModel` outside the [`SFTTrainer`] and pass it.
- For a more memory-efficient training using adapters, you can load the base model in 8bit, for that simply add `load_in_8bit` argument when creating the [`SFTTrainer`], or create a base model in 8bit outside the trainer and pass it.
- If you create a model outside the trainer, make sure not to pass to the trainer any additional keyword arguments that are relative to `from_pretrained()` method.
## Multi-GPU Training
Trainer (and thus SFTTrainer) supports multi-GPU training. If you run your script with `python script.py` it will default to using DP as the strategy, which may be [slower than expected](https://github.com/huggingface/trl/issues/1303). To use DDP (which is generally recommended, see [here](https://huggingface.co/docs/transformers/en/perf_train_gpu_many?select-gpu=Accelerate#data-parallelism) for more info) you must launch the script with `python -m torch.distributed.launch script.py` or `accelerate launch script.py`. For DDP to work, you must also check the following:
- If you're using gradient_checkpointing, add the following to the TrainingArguments: `gradient_checkpointing_kwargs={'use_reentrant':False}` (more info [here](https://github.com/huggingface/transformers/issues/26969)
- Ensure that the model is placed on the correct device:
```python
from accelerate import PartialState
device_string = PartialState().process_index
model = AutoModelForCausalLM.from_pretrained(
...
device_map={'':device_string}
)
```
## GPTQ Conversion
You may experience some issues with GPTQ Quantization after completing training. Lowering `gradient_accumulation_steps` to `4` will resolve most issues during the quantization process to GPTQ format.
## Extending `SFTTrainer` for Vision Language Models
`SFTTrainer` does not inherently support vision-language data. However, we provide a guide on how to tweak the trainer to support vision-language data. Specifically, you need to use a custom data collator that is compatible with vision-language data. This guide outlines the steps to make these adjustments. For a concrete example, refer to the script [`examples/scripts/sft_vlm.py`](https://github.com/huggingface/trl/blob/main/examples/scripts/sft_vlm.py), which demonstrates how to fine-tune the LLaVA 1.5 model on the [HuggingFaceH4/llava-instruct-mix-vsft](https://huggingface.co/datasets/HuggingFaceH4/llava-instruct-mix-vsft) dataset.
### Preparing the Data
The data format is flexible, provided it is compatible with the custom collator that we will define later. A common approach is to use conversational data. Given that the data includes both text and images, the format needs to be adjusted accordingly. Below is an example of a conversational data format involving both text and images:
```python
images = ["obama.png"]
messages = [
{
"role": "user",
"content": [
{"type": "text", "text": "Who is this?"},
{"type": "image"}
]
},
{
"role": "assistant",
"content": [
{"type": "text", "text": "Barack Obama"}
]
},
{
"role": "user",
"content": [
{"type": "text", "text": "What is he famous for?"}
]
},
{
"role": "assistant",
"content": [
{"type": "text", "text": "He is the 44th President of the United States."}
]
}
]
```
To illustrate how this data format will be processed using the LLaVA model, you can use the following code:
```python
from transformers import AutoProcessor
processor = AutoProcessor.from_pretrained("llava-hf/llava-1.5-7b-hf")
print(processor.apply_chat_template(messages, tokenize=False))
```
The output will be formatted as follows:
```txt
Who is this? ASSISTANT: Barack Obama USER: What is he famous for? ASSISTANT: He is the 44th President of the United States.
```
<iframe src="https://huggingface.co/datasets/HuggingFaceH4/llava-instruct-mix-vsft/embed/viewer/default/train" frameborder="0" width="100%" height="560px"></iframe>
### A custom collator for processing multi-modal data
Unlike the default behavior of `SFTTrainer`, processing multi-modal data is done on the fly during the data collation process. To do this, you need to define a custom collator that processes both the text and images. This collator must take a list of examples as input (see the previous section for an example of the data format) and return a batch of processed data. Below is an example of such a collator:
```python
def collate_fn(examples):
# Get the texts and images, and apply the chat template
texts = [processor.apply_chat_template(example["messages"], tokenize=False) for example in examples]
images = [example["images"][0] for example in examples]
# Tokenize the texts and process the images
batch = processor(texts, images, return_tensors="pt", padding=True)
# The labels are the input_ids, and we mask the padding tokens in the loss computation
labels = batch["input_ids"].clone()
labels[labels == processor.tokenizer.pad_token_id] = -100
batch["labels"] = labels
return batch
```
We can verify that the collator works as expected by running the following code:
```python
from datasets import load_dataset
dataset = load_dataset("HuggingFaceH4/llava-instruct-mix-vsft", split="train")
examples = [dataset[0], dataset[1]] # Just two examples for the sake of the example
collated_data = collate_fn(examples)
print(collated_data.keys()) # dict_keys(['input_ids', 'attention_mask', 'pixel_values', 'labels'])
```
### Training the vision-language model
Now that we have prepared the data and defined the collator, we can proceed with training the model. To ensure that the data is not processed as text-only, we need to set a couple of arguments in the `SFTConfig`, specifically `remove_unused_columns` and `skip_prepare_dataset` to `True` to avoid the default processing of the dataset. Below is an example of how to set up the `SFTTrainer`.
```python
training_args.remove_unused_columns = False
training_args.dataset_kwargs = {"skip_prepare_dataset": True}
trainer = SFTTrainer(
model=model,
args=training_args,
data_collator=collate_fn,
train_dataset=train_dataset,
processing_class=processor.tokenizer,
)
```
A full example of training LLaVa 1.5 on the [HuggingFaceH4/llava-instruct-mix-vsft](https://huggingface.co/datasets/HuggingFaceH4/llava-instruct-mix-vsft) dataset can be found in the script [`examples/scripts/sft_vlm.py`](https://github.com/huggingface/trl/blob/main/examples/scripts/sft_vlm.py).
- [Experiment tracking](https://wandb.ai/huggingface/trl/runs/2b2c5l7s)
- [Trained model](https://huggingface.co/HuggingFaceH4/sft-llava-1.5-7b-hf)
## SFTTrainer
[[autodoc]] SFTTrainer
## SFTConfig
[[autodoc]] SFTConfig
## Datasets
In the SFTTrainer, we smartly support `datasets.IterableDataset` in addition to other style datasets. This is useful if you are using large corpora that you do not want to save all to disk. The data will be tokenized and processed on the fly, even when packing is enabled.
Additionally, in the SFTTrainer, we support pre-tokenized datasets if they are `datasets.Dataset` or `datasets.IterableDataset`. In other words, if such a dataset has a column of `input_ids`, no further processing (tokenization or packing) will be done, and the dataset will be used as-is. This can be useful if you have pretokenized your dataset outside of this script and want to reuse it directly.
|